Electronics
projects
log
4/28/22
- check voltage drop 5v->LED->220->gnd When a pin on the nodemcu is connected to ground (or a voltage under .8 volts) it will return 0, and when it is exposed to a voltage over 2.4 volts it will return high. Anywhere in between .8 and 2.4 and you won’t reliably be able to predict the pin reading.
- LED voltage drop white:2.8v, green:1.9v, yellow:1.9v, red:1.8v
cascada 2.0
secstidif HTU12D temp/humidity sensor
using HiLetgo HTU21D Temperature Humidity Sensor with Adafruit HTU21DF Library by Adafruit.used in:
- attic temp_hum sensor CYURD118
- master bedroom greenhouse CYURD004
timecards
- 2/3/22
- Like everything on Omen, WSL2 now points to /home/tim/www as the path for localhost. I couldn't get /home/tim/www/timecards/pay/v0 to compile without errors. So I pulled the getW2 function out into its own app on /home/tim/www/react/v17/tcard_w2. To get localhost and apps.sitebuilt to run it, I copied the timecards token into local storage on the Omen.
- The basic process of updating to new w2 forms is to download the fw2--2020.pdf from the web, convert pdf->jpg then pick out the required filenames as listed in tcard-w2/b64/2021 and drag those jpg's into a jpg->b64 converter, adding data:image/jpeg;base64, at the beginning of each file. Then change the import directives at the top of jobs.sj
future
conversion calculator
liters to cups or ounces, cups in fractions available on measuring cup
(.75/3)L = ?c?o
circuit boards
cascada

esp8266-700ma-1out-1in


ecurriculum
There is a basic parts kit, wiki, soldering stations, multiple task paths, game format, computers, projector, equip furniture at bbmc.
modules
temp sensor, relay, timers, leds, webconfig, frontend.
topics
energy, impedance v=ir, datasheets, modules, architecture, design, progressive iteration
tasks
solder, test and inspect solder, build components, test components, start narrative,
https://learn.sparkfun.com/tutorials/how-to-read-a-schematic/all
wiki
student accounts, supplementary info(level1,2,3,,4), student logs, explain in your own words, supplementary info written summary, supplementary info presentation, research project.
quizzes
design and prove before building, word problem quizzes, architecture quizzes, logic quizzes, current list of point increasing options for each student, supplementary info quiz,
weapons
basic weapons, bonus weapons, using quiz points, using called out to class points, trading weapons: for physical task, for modules/devices, for teaching, for learning, supplementary info quiz, supplementary info summary, supplementary info presentation, stepping up to the schedule.
parts index
- 20F40HF
- high current diodes of
lcd displays
http://www.inexglobal.com/downloads/glcd5110.pdf https://www.sparkfun.com/products/10168 https://learn.sparkfun.com/tutorials/graphic-lcd-hookup-guide?_ga=2.247577219.589590858.1580362058-965733284.1569446725
date/time
- https://en.wikipedia.org/wiki/List_of_tz_database_time_zones
- https://github.com/abritinthebay/datejs
- https://developer.mozilla.org/en-US/docs/Web/JavaScript/Reference/Global_Objects/Date/getTimezoneOffset
- http://momentjs.com/timezone
- https://developers.google.com/maps/documentation/timezone/usage-limits#standard-usage-limits
timers
- http://www.switchdoc.com/2015/10/iot-esp8266-timer-tutorial-arduino-ide/
- http://www.pjrc.com/teensy/td_libs_Time.html
- http://www.pjrc.com/teensy/td_libs_TimeAlarms.html
- https://github.com/Toshik/TickerScheduler
line voltage
Arduino
software libraries
- https://github.com/esp8266/Arduino
- https://github.com/PaulStoffregen/Time
- https://github.com/Toshik/TickerScheduler
- http://www.pjrc.com/teensy/td_libs_TimeAlarms.html
- https://hackaday.io/project/4588-esp8266-interrupt-driven-meter-monitor/log/14892-some-software-very-early-test-code
- https://github.com/bblanchon/ArduinoJson/wiki/Decoding-JSON
back to electronics thrift circuits arduino https://github.com/sandeepmistry/esp8266-Arduino/tree/master/esp8266com/esp8266/libraries/Ticker
sketches
C++
floats
http://teknologi.arahmadi.net/2014/06/writing-and-reading-float-using-arduino.html
classes
- http://stackoverflow.com/questions/1735990/using-classes-with-the-arduino
- http://playground.arduino.cc/Code/Library
- http://en.cppreference.com/w/cpp/language/initializer_list
- http://arduinoetcetera.blogspot.com/2011/01/classes-within-classes-initialiser.html
- http://stackoverflow.com/questions/7603981/c-initialization-lists-for-multiple-variables
char strings
arrays
- http://stackoverflow.com/questions/5157439/why-doesnt-c-support-functions-returning-arrays
- http://stackoverflow.com/questions/8948653/creating-dynamic-array-of-string-c
- http://forum.allaboutcircuits.com/threads/arduino-array-of-strings-char-arrays.98257/
- http://forum.arduino.cc/index.php?topic=220385.0
using sublime
- starting a new sketch
- add a newp dir with a newp.ino in sublime and then from arduino open it.
esp8266

current projects
hvac
- DHT shroom
- humidity temp control for noah -dht11+2relays 1 input, 2output
- temp
- outdoor thermometer -ds18b20, 1 input
- DSP18B20 hrc
- heated roof control-1 relay, 2inputs, 1output
- timerrelay
- timer for plants 1relay 1 output
- DHT irrig
- gravity feed water release (moisture level input dht11(io14d5)), out timr1(io15d8)
using with HDT11

- https://www.wemos.cc/product/dht-shield.html
- https://github.com/adafruit/DHT-sensor-library
- https://github.com/wemos/D1_mini_Examples/blob/master/examples/04.Shields/DHT_Shield/Simple/Simple.ino
- http://www.circuitbasics.com/how-to-set-up-the-dht11-humidity-sensor-on-the-raspberry-pi/
- http://www.circuitbasics.com/how-to-set-up-the-dht11-humidity-sensor-on-an-arduino
notes on esp8266
Hi Mitul,
My best esp8266 code is in https://github.com/mckennatim/demiot. A couple of notes on it.
You can always get it online by hard coding your SSID info ala...
   #include <ESP8266WiFi.h>
   #include <ESP8266WebServer.h>

   const char *ssid = "street_no_vale2";
   const char *pwd = "jjjjjjjj";

   ESP8266WebServer server(80);

   void handleRoot() {
     server.send(200, "text/html", "h1 root of espAPsb AP server /h1");
   }

   void getOnline(){
     WiFi.begin(ssid, pwd);
     int tries =0;
     int success=1;
     while (WiFi.status() != WL_CONNECTED ) {
       delay(500);
       Serial.print(".");
       tries++;
       if (tries==15){
         success=0;
         scan();
         setupAP();
         break;
       }
     }
     if (success){
       Serial.println("");
       Serial.println("WiFi connected");
       Serial.print("IP address: ");
       Serial.println(WiFi.localIP());
     }
   }
   void setup(){
     Serial.begin(115200);
     Serial.println();
     Serial.println("--------------------------");
     Serial.println("ESP8266 webconfig");
     Serial.println("--------------------------");
     getOnline();
   }
   void loop(){
     server.handleClient();
   }
but that is not at all interesting for a couple of reasons
- you shouldn't have to be reconnect and upload over USB every time you move to a new SSID
- this sets you up as a server instead of client. There are lots of downsides to that. (your customers have to open ports on their routers ala xbox, an outside server&clients needs to keep track of its IP...)
So you need to be able to webconfig the thing and then run it as a client.
In denmiot/essp8266/mqttall I broke out webconfig in `#include "config.h"` (excuse the `extern` globals).
setup calls getOnline() which reads a config from the EEPROM and connects but if that fails it jumps into webconfig mode, turning itself into and access point server with an SSID of `espAPsb` and an ip of 192.168.4.1 where you can send it a get string like
http://192.168.4.1/config?ssid=street_no_vale2&pwd=jjjjjjjj&devid=CYURD001&ip=10.0.1.100&port=3332
once you send it that it reboots itself (sometimes you need to hit the reset or powerdown) as a client on your local wifi.
mqtt
mqtt is a very cool pu/sub/ protocol. For some reason though it won't automatically reconnect when you do a webconfig. You have to power down first
TLS on esp8266
- back to TLS_SSL
refs
http://shinysparkly.com/blog/2015/05/31/node-in-apache/
https://github.com/mcollina/mosca/wiki/TLS-SSL-Configuration
https://github.com/esp8266/Arduino/issues/43 ssl on espe266
https://github.com/esp8266/Arduino/issues/2306
me: Normally one would want the baddest certifcate you can get, un-deciferable cifers, un-stealable keys ...
I have a different need, a dumbed down tls1.1 small key/cipher/cert that will work on esp8266's, these tiny, wifi enabled, mqtt protoocol running, $2, iot devices. OK so I made a 512byte private key. Now I need to make a cert and a sha-1 thumbprint that will work with small memory devices using tls1.1, TLSRSAWITHAES128CBCSHA or RC4-MD5 ciphers.
Any ideas on an oppenssl command to get that?
https://www.feistyduck.com/library/openssl-cookbook/online/ch-openssl.html#
https://www.openssl.org/docs/man1.0.2/apps/ciphers.html#CIPHER-LIST-FORMAT
http://unix.stackexchange.com/questions/140601/verifying-a-ssl-certificates-fingerprint
http://serverfault.com/questions/216814/wireshark-display-filter-protocol-tlsv1-and-packetlength
ssl.record.version == 0x0302
That tells Wireshark to only display packets that are SSL conversations using TLS semantics.
http://blog.abarbanell.de/raspberry/2016/01/09/arduino-nginx/
me: Doesn't the nginx proxy need crt's and key's? Will it just work like a browser and encrypt deencrypt automagically?
Tobias Abarbanell Hi Tim, in this process the nginx is a server receiving requests over http and then on the encrypted side it is a client, so it does not need to have certificates.
If you want traffic coming the other direction, from the outside to your devices you would need certificates on the nginx and I would recommend using letsencrypt (https://letsencrypt.org) for this purpose.
Hi Tobias,
Thanks. BTW I think I had already solved the "traffic coming the other direction" problem. I've been loving mqtt as a lightweight protocol to have my esp8266's converse with the world. On my outside nginx vps I am running mosca inside a node app. Mosca is a broker. Devices an clients subscribe and publish to topics and mosca routes them. So my guess is having the pi handle the tls stuff, I'd be able to get data in too.
Meanwhile if I've discovered (after lots of error and error) if I limit the ciphers and keysize I can get TLSv1.1 working rather reliably straight from the esp8266. I haven't dropped a handshake in an hour now. Having WiFiClientSecure just use a fingerprint of the certificate (512 bit certificate) it verifies and accepts the cert. Instead of letting node run with its TLSv1.2 super secure big bloated ciphers I start node like this: node --tls-cipher-list='TLS_RSA_WITH_AES_128_CBC_SHA:RC4-MD5' lib/index.js. Ok so I won't win any awards for TLS and can't use AWS IOT(req TLSv1.2 and big ciphers), but the sensors and relays all over my house and yard will be very hard to mess with nonetheless.
Mosca sends mqtt to web clients using websockets. That's the final piece of the puzzle for me to tackle, wss for apache(windows testmachine) and nginx(ubuntu16.04vps)
Your idea is brilliant and I can't wait to try it on a pi.
https://github.com/esp8266/Arduino/issues/2306
As you see from the list, two cipher suites supported by axTLS library on the ESP side (TLS_RSA_WITH_AES_128_CBC_SHA and TLS_RSA_WITH_AES_256_CBC_SHA) are not among the list of cipher suites supported by your server. This causes handshake failure, because if the server and client have no cipher suites in common, they can't talk to each other.
now the above post shows the current library supports RC4-MD5 (I believe) - but I'm not sure how to prioritize it in the handshake? That is, until SHA256 is added :)
https://github.com/esp8266/Arduino/issues/2201
http://nodemcu.readthedocs.io/en/latest/en/modules/crypto/
for nodemcu The crypto modules provides various functions for working with cryptographic algorithms.
The following encryption/decryption algorithms/modes are supported: - "AES-ECB" for 128-bit AES in ECB mode (NOT recommended) - "AES-CBC" for 128-bit AES in CBC mode
The following hash algorithms are supported: - MD2 (not available by default, has to be explicitly enabled in app/include/user_config.h) - MD5 - SHA1 - SHA256, SHA384, SHA512 (unless disabled in app/include/user_config.h)
{"given_cipher_suites":["TLS_RSA_WITH_AES_128_CBC_SHA","TLS_RSA_WITH_AES_256_CBC_SHA","TLS_RSA_WITH_RC4_128_SHA","TLS_RSA_WITH_RC4_128_MD5"],"ephemeral_keys_supported":false,"session_ticket_supported":false,"tls_compression_supported":false,"unknown_cipher_suite_supported":false,"beast_vuln":false,"able_to_detect_n_minus_one_splitting":false,"insecure_cipher_suites":{"TLS_RSA_WITH_RC4_128_MD5":["use RC4 which has insecure biases in its output"],"TLS_RSA_WITH_RC4_128_SHA":["use RC4 which has insecure biases in its output"]},"tls_version":"TLS 1.1","rating":"Bad"}
{"pid":5768,"hostname":"tim-hp","name":"mosca","level":40,"time":1484804098536,"msg":"101057795:error:14094410:SSL routines:ssl3_read_bytes:sslv3 alert handshake failure:openssl\\ssl\\s3_pkt.c:1472:SSL alert number 40\n","type":"Error","stack":"Error: 101057795:error:14094410:SSL routines:ssl3_read_bytes:sslv3 alert handshake failure:openssl\\ssl\\s3_pkt.c:1472:SSL alert number 40\n\n at Error (native)","client":"ESP8266Client-e1e","v":1}
openssl s_client -connect sslvh.tm:8883 -tls1
CONNECTED(00000003)
depth=0 /C=US/ST=MA/L=Boston/O=sitebuilt.net/OU=dog/CN=sslvh.tm/emailAddress=mckenna.tim@gmail.com
verify error:num=18:self signed certificate
verify return:1
depth=0 /C=US/ST=MA/L=Boston/O=sitebuilt.net/OU=dog/CN=sslvh.tm/emailAddress=mckenna.tim@gmail.com
verify return:1
---
Certificate chain
 0 s:/C=US/ST=MA/L=Boston/O=sitebuilt.net/OU=dog/CN=sslvh.tm/emailAddress=mckenna.tim@gmail.com
   i:/C=US/ST=MA/L=Boston/O=sitebuilt.net/OU=dog/CN=sslvh.tm/emailAddress=mckenna.tim@gmail.com
---
Server certificate
-----BEGIN CERTIFICATE-----
MIIDkjCCAnoCCQDp7cwG8OKZBjANBgkqhkiG9w0BAQUFADCBijELMAkGA1UEBhMC
VVMxCzAJBgNVBAgMAk1BMQ8wDQYDVQQHDAZCb3N0b24xFjAUBgNVBAoMDXNpdGVi
dWlsdC5uZXQxDDAKBgNVBAsMA2RvZzERMA8GA1UEAwwIc3NsdmgudG0xJDAiBgkq
hkiG9w0BCQEWFW1ja2VubmEudGltQGdtYWlsLmNvbTAeFw0xNzAxMTMyMjExMzla
Fw0xODAxMTMyMjExMzlaMIGKMQswCQYDVQQGEwJVUzELMAkGA1UECAwCTUExDzAN
BgNVBAcMBkJvc3RvbjEWMBQGA1UECgwNc2l0ZWJ1aWx0Lm5ldDEMMAoGA1UECwwD
ZG9nMREwDwYDVQQDDAhzc2x2aC50bTEkMCIGCSqGSIb3DQEJARYVbWNrZW5uYS50
aW1AZ21haWwuY29tMIIBIjANBgkqhkiG9w0BAQEFAAOCAQ8AMIIBCgKCAQEAtobF
4ubgPP4bEQlhXCIMA7vwi7oqjJZ6qhp80tMdhvcI/Cjz/BsGKtxbiLlivcJozV67
YOdidTS1CjH7vmxxxhIodF+g6LdoSJ75Sa2iRvCzbeGkrcNRL93jTkqQvYoG4GEz
t5aBLnFnVDCr299d+VchOGv1Q3ChvLNxAU6TqMzhPoHKPH7DnGF9wSR9qvRP7rI+
wq9+QeuLdQaQmUVnt80OZFp2Oq/9WGu5tiEie7JZcFqbNq2dFycIm2wa2/4mBJvA
5Qcw6aV5C0Al870go0O6OSIODZ+RQg/KRunXXtFcSqdi8iuF6R2tzNbd5Vh2+ANK
lTfStFJAH9IcXE/EVwIDAQABMA0GCSqGSIb3DQEBBQUAA4IBAQCmalVCojqvTHlE
guDhoRX98FldiCpAI40ZWODiClQe7IR6ANPc8rqsMtfyfwIsYdXqcZzj5NBrIGp1
SST7uVoA2YIy4eGs8AmKNKf4CkLEPM+7ST5mmpKtrUNmHrFjYUyn6C/iu8Vyx6lP
MadCPezDB8qeCj5Z3ylYTLIBog1f29gkmqTCJtt7FIhFECSUGrYVMmyaScXONV5y
UZSnGNoRWuqdcGu0a6PKBb270vpdUa2yPwFWwbMJxsCc/2sT7YQcAk++r6WFk1qF
7AiNdZYsEgmjnkGGHRbjKTxk1Osh+G8uV3e6KzE/G5d0K80dIX8jLSPH6yYCYfe5
msMayEMI
-----END CERTIFICATE-----
subject=/C=US/ST=MA/L=Boston/O=sitebuilt.net/OU=dog/CN=sslvh.tm/emailAddress=mckenna.tim@gmail.com
issuer=/C=US/ST=MA/L=Boston/O=sitebuilt.net/OU=dog/CN=sslvh.tm/emailAddress=mckenna.tim@gmail.com
---
No client certificate CA names sent
---
SSL handshake has read 1080 bytes and written 412 bytes
---
New, TLSv1/SSLv3, Cipher is AES256-SHA
Server public key is 2048 bit
Compression: NONE
Expansion: NONE
SSL-Session:
    Protocol  : TLSv1
    Cipher    : AES256-SHA
    Session-ID: EB450D46B951B96AB6D8F3B10762772F05D8D9E65998FEC796EAA852A335FFD2
    Session-ID-ctx:
    Master-Key: 6F9AA7D47D1E352283BC6D7715A4664E184E4B565B14F6288350E117D3D9F6FD6869F28E66481822B1B37CC35E252BE0
    Key-Arg   : None
    Start Time: 1484812097
    Timeout   : 7200 (sec)
    Verify return code: 18 (self signed certificate)
https://www.bountysource.com/issues/28368887-compatibility-with-arduino-and-esp8266
- http://iot-playground.com/2-uncategorised/40-esp8266-wifi-relay-switch-arduino-ide
- web based configuration
openssl
back to esp8266
in cd ../vhosts/somecerts/smallcerts/
Generate a Private Key and a CSR
openssl req -newkey rsa:512 -nodes -keyout domain.key -out domain.csr
Generate a Self-Signed Certificate from an Existing Private Key
openssl req -key domain.key -new -x509 -days 365 -out domain.crt
View CSR Entries
openssl req -text -noout -verify -in domain.csr
View Certificate Entries
openssl x509 -text -noout -in domain.crt
Verify a Certificate was Signed by a CA
openssl verify -verbose -CAFile ca.crt domain.crt
from https://www.feistyduck.com/library/openssl-cookbook/online/ch-openssl.html#
openssl genrsa -out fd.key 512                           //create private key (no pass)
openssl rsa -in fd.key -pubout -out fd-public.key        //to separate out the public key
openssl req -new -key fd.key -out fd.csr                 //create csr from key
openssl req -text -in fd.csr -noout                      //show your csr
openssl x509 -req -days 365 -in fd.csr -signkey fd.key -out fd.crt          // create a cert w/o questions
openssl x509 -text -in fd.crt -noout                     //view the cert
openssl x509 -text -noout -in fd.crt -fingerprint        //GET A CERTS FINGERPRINT
Ciphers
openssl ciphers -v 'ALL:COMPLEMENTOFALL' //list available
https://engineering.circle.com/https-authorized-certs-with-node-js-315e548354a2#.3atvisjhz
vis a vis letsencrypt
- your key file will be privkey.pem
- your cert file will be cert.pem
- your ca file will be chain.pem or fullchain.pem ( depending exactly what you need )
creating a certificate signing authority ca (and cert and key)
https://jamielinux.com/docs/openssl-certificate-authority/create-the-root-pair.html
Acting as a certificate authority (CA) means dealing with cryptographic pairs of private keys and public certificates. The very first cryptographic pair we’ll create is the root pair. This consists of the root key (ca.key.pem) and root certificate (ca.cert.pem). This pair forms the identity of your CA.
in C:\wamp\vhosts\somecerts\caSetup create root certificates
 mkdir certs crl csr newcerts private
 touch index.txt
 echo 1000 > serial
put in a openssl.conf
openssl genrsa -aes256 -out private/ca.key.pem 4096 //pwd required
openssl req -config openssl.conf -key private/ca.key.pem -new -x509 -days 12000 -sha256 -extensions v3_ca -out certs/ca.cert.pem //need privar pwd and Common Name hpTimCa
openssl x509 -noout -text -in certs/ca.cert.pem //verify root cert
create intermediate certs
 cd intermediate
 mkdir certs crl csr newcerts private
 touch index.txt
 echo 1000 > serial
 echo 1000 > crlnumber
openssl genrsa -aes256 -out intermediate/private/intermediate.key.pem 4096 //same pwd
openssl req -config intermediate/openssl.conf -new -sha256 -key intermediate/private/intermediate.key.pem -out intermediate/csr/intermediate.csr.pem
openssl ca -config openssl.conf -extensions v3_intermediate_ca -days 10900 -notext -md sha256 -in intermediate/csr/intermediate.csr.pem -out intermediate/certs/intermediate.cert.pem
openssl x509 -noout -text -in intermediate/certs/intermediate.cert.pem //verify
openssl verify -CAfile certs/ca.cert.pem intermediate/certs/intermediate.cert.pem //verify against root
cat intermediate/certs/intermediate.cert.pem certs/ca.cert.pem > intermediate/certs/ca-chain.cert.pem
openssl genrsa -out intermediate/private/sslvh.tm.key.pem 2048 //omitting aes256 creates a key without a password
openssl req -config intermediate/openssl.conf -key intermediate/private/sslvh.tm.key.pem -new -sha256 -out intermediate/csr/sslvh.tm.csr.pem
openssl ca -config intermediate/openssl.conf -extensions server_cert -days 9000 -notext -md sha256 -in intermediate/csr/sslvh.tm.csr.pem -out intermediate/certs/sslvh.tm.cert.pem
openssl x509 -noout -text -in intermediate/certs/sslvh.tm.cert.pem
openssl x509 -text -noout -in sslvh.tm.cert.pem -fingerprint
The Issuer is the intermediate CA. The Subject refers to the certificate itself.
openssl verify -CAfile intermediate/certs/ca-chain.cert.pem intermediate/certs/sslvh.tm.cert.pem
You can now either deploy your new certificate to a server, or distribute the certificate to a client. When deploying to a server application (eg, Apache), you need to make the following files available:
- C:\wamp\vhosts\somecerts\caSetup\intermediate\certs\ca-chain.cert.pem
- C:\wamp\vhosts\somecerts\caSetup\intermediate\private\sslvh.tm.key.pem
- C:\wamp\vhosts\somecerts\caSetup\intermediate\certs\sslvh.tm.cert.pem
you could but I didn't create a certifice revocation lis CRL
node
mosca uses the node TLS stuff
from https://nodejs.org/api/tls.html#tls_tls_ssl
This default cipher list can be replaced entirely using the --tls-cipher-list command line switch. For instance, the following makes ECDHE-RSA-AES128-GCM-SHA256:!RC4 the default TLS cipher suite:
node --tls-cipher-list="TLS_RSA_WITH_AES_128_CBC_SHA:RC4-MD5"
debug
sparkfun thing dev
http://frightanic.com/iot/comparison-of-esp8266-nodemcu-development-boards/
- :back to breakout boards
wifi breakout board
refs
wiring
http://www.forward.com.au/pfod/ESP8266/GPIOpins/index.html
https://github.com/esp8266/Arduino/issues/1243

current sensing
http://www.esp8266-projects.com/2015/06/mailbag-arrival-acs712-current-sensor.html
enc28j60
http://arduino-info.wikispaces.com/ArduinoPower http://www.thesunrain.com/Amazon/4%20relay%20board/4-ch%20relay%20module.pdf
http://www.myropcb.com/services-capabilities/pcba-services/
manual upload of sketches
stand-alone-arduino [https://www.sparkfun.com/products/10524 w ATM328+bootloader

arduino advice
C stuff in general
EEprom Utility
EEPROManything
Arduino Wiki
IOT
hacking iot
https://www.thissmarthouse.net/reprogramming-cheap-esp8266-switches/
device pinouts


led pins
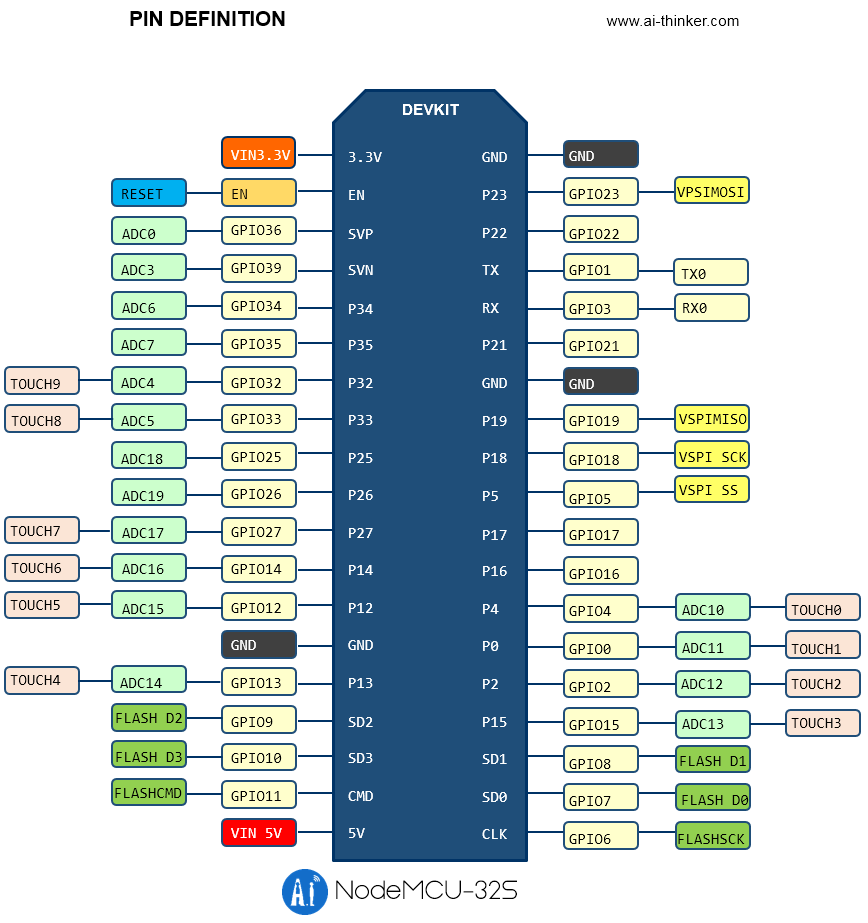
- esp32doit-devkit-v1 = 2
best suppliers
iot (fastest delivery)
esp32 ordered 2/28/19
- Store:FYD Open Source Hardware 13 days
- Roar Kit Store: 20 days
- IGMOPNRQ module Store 28 days
- HESAI 3C Electronic components Store 33days
esp32
expressif conf 22 backto iot
wifi setup over ble
https://desire.giesecke.tk/index.php/2018/04/06/esp32-wifi-setup-over-ble/
https://medium.com/@urish/start-building-with-web-bluetooth-and-progressive-web-apps-6534835959a6
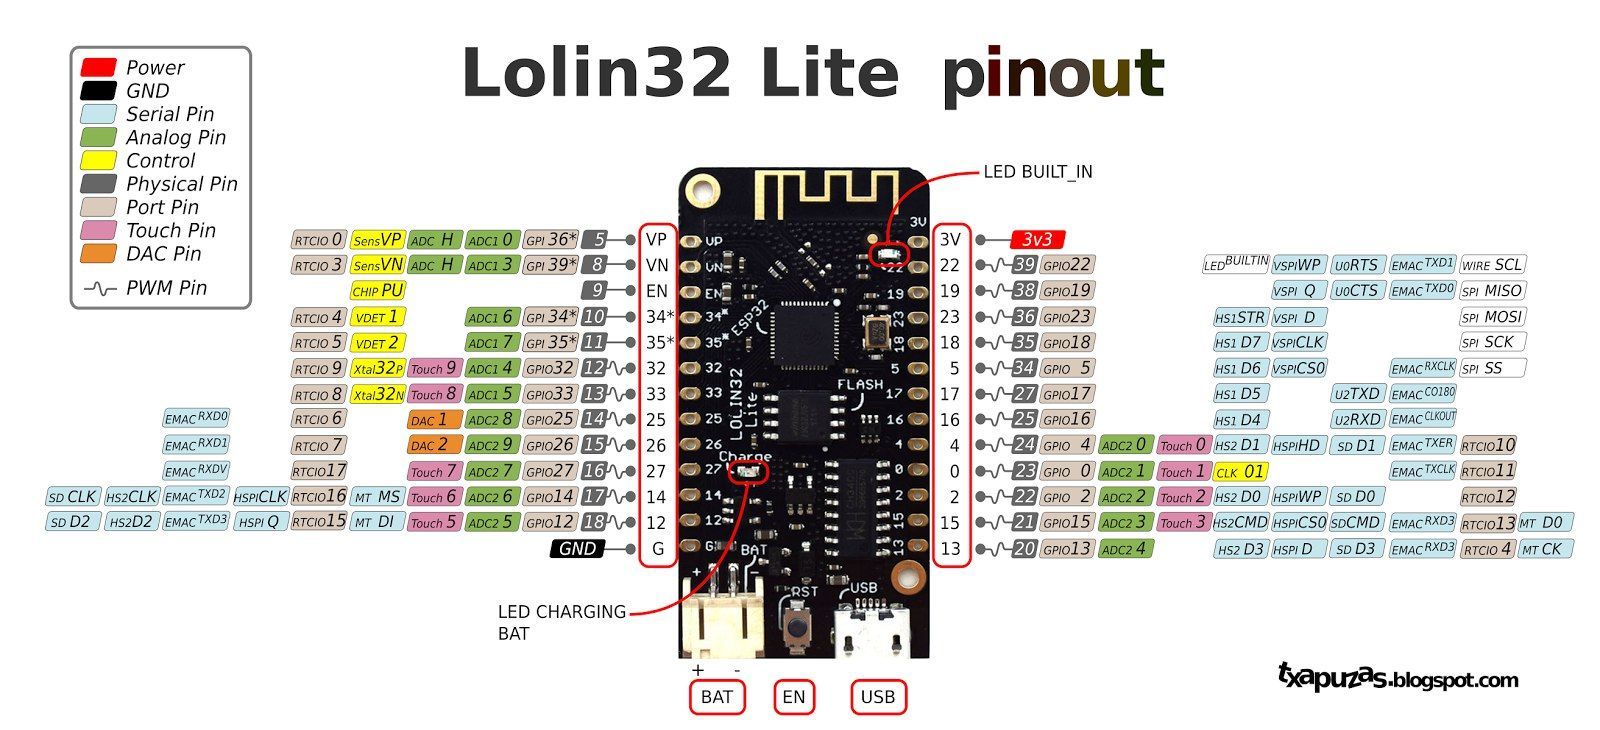
wemos lolin32
esp32 wemos lite v1.0.0 ch340g
dowd q6
212018
turbo k7f64
https://diyprojects.io/wemos-lolin32-lite-compact-revision-lolin32-4-90/#.XHlbjohKhhF
nodemcu esp32s
hold down boot when uploading
esp8266
current projects
hvac
- DHT shroom
- humidity temp control for noah -dht11+2relays 1 input, 2output
- temp
- outdoor thermometer -ds18b20, 1 input
- DSP18B20 hrc
- heated roof control-1 relay, 2inputs, 1output
- timerrelay
- timer for plants 1relay 1 output
- DHT irrig
- gravity feed water release (moisture level input dht11(io14d5)), out timr1(io15d8)
using with HDT11
- https://www.wemos.cc/product/dht-shield.html
- https://github.com/adafruit/DHT-sensor-library
- https://github.com/wemos/D1_mini_Examples/blob/master/examples/04.Shields/DHT_Shield/Simple/Simple.ino
- http://www.circuitbasics.com/how-to-set-up-the-dht11-humidity-sensor-on-the-raspberry-pi/
- http://www.circuitbasics.com/how-to-set-up-the-dht11-humidity-sensor-on-an-arduino
notes on esp8266
Hi Mitul,
My best esp8266 code is in https://github.com/mckennatim/demiot. A couple of notes on it.
You can always get it online by hard coding your SSID info ala...
   #include <ESP8266WiFi.h>
   #include <ESP8266WebServer.h>

   const char *ssid = "street_no_vale2";
   const char *pwd = "jjjjjjjj";

   ESP8266WebServer server(80);

   void handleRoot() {
     server.send(200, "text/html", "h1 root of espAPsb AP server /h1");
   }

   void getOnline(){
     WiFi.begin(ssid, pwd);
     int tries =0;
     int success=1;
     while (WiFi.status() != WL_CONNECTED ) {
       delay(500);
       Serial.print(".");
       tries++;
       if (tries==15){
         success=0;
         scan();
         setupAP();
         break;
       }
     }
     if (success){
       Serial.println("");
       Serial.println("WiFi connected");
       Serial.print("IP address: ");
       Serial.println(WiFi.localIP());
     }
   }
   void setup(){
     Serial.begin(115200);
     Serial.println();
     Serial.println("--------------------------");
     Serial.println("ESP8266 webconfig");
     Serial.println("--------------------------");
     getOnline();
   }
   void loop(){
     server.handleClient();
   }
but that is not at all interesting for a couple of reasons
- you shouldn't have to be reconnect and upload over USB every time you move to a new SSID
- this sets you up as a server instead of client. There are lots of downsides to that. (your customers have to open ports on their routers ala xbox, an outside server&clients needs to keep track of its IP...)
So you need to be able to webconfig the thing and then run it as a client.
In denmiot/essp8266/mqttall I broke out webconfig in `#include "config.h"` (excuse the `extern` globals).
setup calls getOnline() which reads a config from the EEPROM and connects but if that fails it jumps into webconfig mode, turning itself into and access point server with an SSID of `espAPsb` and an ip of 192.168.4.1 where you can send it a get string like
http://192.168.4.1/config?ssid=street_no_vale2&pwd=jjjjjjjj&devid=CYURD001&ip=10.0.1.100&port=3332
once you send it that it reboots itself (sometimes you need to hit the reset or powerdown) as a client on your local wifi.
mqtt
mqtt is a very cool pu/sub/ protocol. For some reason though it won't automatically reconnect when you do a webconfig. You have to power down first
TLS on esp8266
- back to TLS_SSL
refs
http://shinysparkly.com/blog/2015/05/31/node-in-apache/
https://github.com/mcollina/mosca/wiki/TLS-SSL-Configuration
https://github.com/esp8266/Arduino/issues/43 ssl on espe266
https://github.com/esp8266/Arduino/issues/2306
me: Normally one would want the baddest certifcate you can get, un-deciferable cifers, un-stealable keys ...
I have a different need, a dumbed down tls1.1 small key/cipher/cert that will work on esp8266's, these tiny, wifi enabled, mqtt protoocol running, $2, iot devices. OK so I made a 512byte private key. Now I need to make a cert and a sha-1 thumbprint that will work with small memory devices using tls1.1, TLSRSAWITHAES128CBCSHA or RC4-MD5 ciphers.
Any ideas on an oppenssl command to get that?
https://www.feistyduck.com/library/openssl-cookbook/online/ch-openssl.html#
https://www.openssl.org/docs/man1.0.2/apps/ciphers.html#CIPHER-LIST-FORMAT
http://unix.stackexchange.com/questions/140601/verifying-a-ssl-certificates-fingerprint
http://serverfault.com/questions/216814/wireshark-display-filter-protocol-tlsv1-and-packetlength
ssl.record.version == 0x0302
That tells Wireshark to only display packets that are SSL conversations using TLS semantics.
http://blog.abarbanell.de/raspberry/2016/01/09/arduino-nginx/
me: Doesn't the nginx proxy need crt's and key's? Will it just work like a browser and encrypt deencrypt automagically?
Tobias Abarbanell Hi Tim, in this process the nginx is a server receiving requests over http and then on the encrypted side it is a client, so it does not need to have certificates.
If you want traffic coming the other direction, from the outside to your devices you would need certificates on the nginx and I would recommend using letsencrypt (https://letsencrypt.org) for this purpose.
Hi Tobias,
Thanks. BTW I think I had already solved the "traffic coming the other direction" problem. I've been loving mqtt as a lightweight protocol to have my esp8266's converse with the world. On my outside nginx vps I am running mosca inside a node app. Mosca is a broker. Devices an clients subscribe and publish to topics and mosca routes them. So my guess is having the pi handle the tls stuff, I'd be able to get data in too.
Meanwhile if I've discovered (after lots of error and error) if I limit the ciphers and keysize I can get TLSv1.1 working rather reliably straight from the esp8266. I haven't dropped a handshake in an hour now. Having WiFiClientSecure just use a fingerprint of the certificate (512 bit certificate) it verifies and accepts the cert. Instead of letting node run with its TLSv1.2 super secure big bloated ciphers I start node like this: node --tls-cipher-list='TLS_RSA_WITH_AES_128_CBC_SHA:RC4-MD5' lib/index.js. Ok so I won't win any awards for TLS and can't use AWS IOT(req TLSv1.2 and big ciphers), but the sensors and relays all over my house and yard will be very hard to mess with nonetheless.
Mosca sends mqtt to web clients using websockets. That's the final piece of the puzzle for me to tackle, wss for apache(windows testmachine) and nginx(ubuntu16.04vps)
Your idea is brilliant and I can't wait to try it on a pi.
https://github.com/esp8266/Arduino/issues/2306
As you see from the list, two cipher suites supported by axTLS library on the ESP side (TLS_RSA_WITH_AES_128_CBC_SHA and TLS_RSA_WITH_AES_256_CBC_SHA) are not among the list of cipher suites supported by your server. This causes handshake failure, because if the server and client have no cipher suites in common, they can't talk to each other.
now the above post shows the current library supports RC4-MD5 (I believe) - but I'm not sure how to prioritize it in the handshake? That is, until SHA256 is added :)
https://github.com/esp8266/Arduino/issues/2201
http://nodemcu.readthedocs.io/en/latest/en/modules/crypto/
for nodemcu The crypto modules provides various functions for working with cryptographic algorithms.
The following encryption/decryption algorithms/modes are supported: - "AES-ECB" for 128-bit AES in ECB mode (NOT recommended) - "AES-CBC" for 128-bit AES in CBC mode
The following hash algorithms are supported: - MD2 (not available by default, has to be explicitly enabled in app/include/user_config.h) - MD5 - SHA1 - SHA256, SHA384, SHA512 (unless disabled in app/include/user_config.h)
{"given_cipher_suites":["TLS_RSA_WITH_AES_128_CBC_SHA","TLS_RSA_WITH_AES_256_CBC_SHA","TLS_RSA_WITH_RC4_128_SHA","TLS_RSA_WITH_RC4_128_MD5"],"ephemeral_keys_supported":false,"session_ticket_supported":false,"tls_compression_supported":false,"unknown_cipher_suite_supported":false,"beast_vuln":false,"able_to_detect_n_minus_one_splitting":false,"insecure_cipher_suites":{"TLS_RSA_WITH_RC4_128_MD5":["use RC4 which has insecure biases in its output"],"TLS_RSA_WITH_RC4_128_SHA":["use RC4 which has insecure biases in its output"]},"tls_version":"TLS 1.1","rating":"Bad"}
{"pid":5768,"hostname":"tim-hp","name":"mosca","level":40,"time":1484804098536,"msg":"101057795:error:14094410:SSL routines:ssl3_read_bytes:sslv3 alert handshake failure:openssl\\ssl\\s3_pkt.c:1472:SSL alert number 40\n","type":"Error","stack":"Error: 101057795:error:14094410:SSL routines:ssl3_read_bytes:sslv3 alert handshake failure:openssl\\ssl\\s3_pkt.c:1472:SSL alert number 40\n\n at Error (native)","client":"ESP8266Client-e1e","v":1}
openssl s_client -connect sslvh.tm:8883 -tls1
CONNECTED(00000003)
depth=0 /C=US/ST=MA/L=Boston/O=sitebuilt.net/OU=dog/CN=sslvh.tm/emailAddress=mckenna.tim@gmail.com
verify error:num=18:self signed certificate
verify return:1
depth=0 /C=US/ST=MA/L=Boston/O=sitebuilt.net/OU=dog/CN=sslvh.tm/emailAddress=mckenna.tim@gmail.com
verify return:1
---
Certificate chain
 0 s:/C=US/ST=MA/L=Boston/O=sitebuilt.net/OU=dog/CN=sslvh.tm/emailAddress=mckenna.tim@gmail.com
   i:/C=US/ST=MA/L=Boston/O=sitebuilt.net/OU=dog/CN=sslvh.tm/emailAddress=mckenna.tim@gmail.com
---
Server certificate
-----BEGIN CERTIFICATE-----
MIIDkjCCAnoCCQDp7cwG8OKZBjANBgkqhkiG9w0BAQUFADCBijELMAkGA1UEBhMC
VVMxCzAJBgNVBAgMAk1BMQ8wDQYDVQQHDAZCb3N0b24xFjAUBgNVBAoMDXNpdGVi
dWlsdC5uZXQxDDAKBgNVBAsMA2RvZzERMA8GA1UEAwwIc3NsdmgudG0xJDAiBgkq
hkiG9w0BCQEWFW1ja2VubmEudGltQGdtYWlsLmNvbTAeFw0xNzAxMTMyMjExMzla
Fw0xODAxMTMyMjExMzlaMIGKMQswCQYDVQQGEwJVUzELMAkGA1UECAwCTUExDzAN
BgNVBAcMBkJvc3RvbjEWMBQGA1UECgwNc2l0ZWJ1aWx0Lm5ldDEMMAoGA1UECwwD
ZG9nMREwDwYDVQQDDAhzc2x2aC50bTEkMCIGCSqGSIb3DQEJARYVbWNrZW5uYS50
aW1AZ21haWwuY29tMIIBIjANBgkqhkiG9w0BAQEFAAOCAQ8AMIIBCgKCAQEAtobF
4ubgPP4bEQlhXCIMA7vwi7oqjJZ6qhp80tMdhvcI/Cjz/BsGKtxbiLlivcJozV67
YOdidTS1CjH7vmxxxhIodF+g6LdoSJ75Sa2iRvCzbeGkrcNRL93jTkqQvYoG4GEz
t5aBLnFnVDCr299d+VchOGv1Q3ChvLNxAU6TqMzhPoHKPH7DnGF9wSR9qvRP7rI+
wq9+QeuLdQaQmUVnt80OZFp2Oq/9WGu5tiEie7JZcFqbNq2dFycIm2wa2/4mBJvA
5Qcw6aV5C0Al870go0O6OSIODZ+RQg/KRunXXtFcSqdi8iuF6R2tzNbd5Vh2+ANK
lTfStFJAH9IcXE/EVwIDAQABMA0GCSqGSIb3DQEBBQUAA4IBAQCmalVCojqvTHlE
guDhoRX98FldiCpAI40ZWODiClQe7IR6ANPc8rqsMtfyfwIsYdXqcZzj5NBrIGp1
SST7uVoA2YIy4eGs8AmKNKf4CkLEPM+7ST5mmpKtrUNmHrFjYUyn6C/iu8Vyx6lP
MadCPezDB8qeCj5Z3ylYTLIBog1f29gkmqTCJtt7FIhFECSUGrYVMmyaScXONV5y
UZSnGNoRWuqdcGu0a6PKBb270vpdUa2yPwFWwbMJxsCc/2sT7YQcAk++r6WFk1qF
7AiNdZYsEgmjnkGGHRbjKTxk1Osh+G8uV3e6KzE/G5d0K80dIX8jLSPH6yYCYfe5
msMayEMI
-----END CERTIFICATE-----
subject=/C=US/ST=MA/L=Boston/O=sitebuilt.net/OU=dog/CN=sslvh.tm/emailAddress=mckenna.tim@gmail.com
issuer=/C=US/ST=MA/L=Boston/O=sitebuilt.net/OU=dog/CN=sslvh.tm/emailAddress=mckenna.tim@gmail.com
---
No client certificate CA names sent
---
SSL handshake has read 1080 bytes and written 412 bytes
---
New, TLSv1/SSLv3, Cipher is AES256-SHA
Server public key is 2048 bit
Compression: NONE
Expansion: NONE
SSL-Session:
    Protocol  : TLSv1
    Cipher    : AES256-SHA
    Session-ID: EB450D46B951B96AB6D8F3B10762772F05D8D9E65998FEC796EAA852A335FFD2
    Session-ID-ctx:
    Master-Key: 6F9AA7D47D1E352283BC6D7715A4664E184E4B565B14F6288350E117D3D9F6FD6869F28E66481822B1B37CC35E252BE0
    Key-Arg   : None
    Start Time: 1484812097
    Timeout   : 7200 (sec)
    Verify return code: 18 (self signed certificate)
https://www.bountysource.com/issues/28368887-compatibility-with-arduino-and-esp8266
- http://iot-playground.com/2-uncategorised/40-esp8266-wifi-relay-switch-arduino-ide
- web based configuration
openssl
back to esp8266
in cd ../vhosts/somecerts/smallcerts/
Generate a Private Key and a CSR
openssl req -newkey rsa:512 -nodes -keyout domain.key -out domain.csr
Generate a Self-Signed Certificate from an Existing Private Key
openssl req -key domain.key -new -x509 -days 365 -out domain.crt
View CSR Entries
openssl req -text -noout -verify -in domain.csr
View Certificate Entries
openssl x509 -text -noout -in domain.crt
Verify a Certificate was Signed by a CA
openssl verify -verbose -CAFile ca.crt domain.crt
from https://www.feistyduck.com/library/openssl-cookbook/online/ch-openssl.html#
openssl genrsa -out fd.key 512                           //create private key (no pass)
openssl rsa -in fd.key -pubout -out fd-public.key        //to separate out the public key
openssl req -new -key fd.key -out fd.csr                 //create csr from key
openssl req -text -in fd.csr -noout                      //show your csr
openssl x509 -req -days 365 -in fd.csr -signkey fd.key -out fd.crt          // create a cert w/o questions
openssl x509 -text -in fd.crt -noout                     //view the cert
openssl x509 -text -noout -in fd.crt -fingerprint        //GET A CERTS FINGERPRINT
Ciphers
openssl ciphers -v 'ALL:COMPLEMENTOFALL' //list available
https://engineering.circle.com/https-authorized-certs-with-node-js-315e548354a2#.3atvisjhz
vis a vis letsencrypt
- your key file will be privkey.pem
- your cert file will be cert.pem
- your ca file will be chain.pem or fullchain.pem ( depending exactly what you need )
creating a certificate signing authority ca (and cert and key)
https://jamielinux.com/docs/openssl-certificate-authority/create-the-root-pair.html
Acting as a certificate authority (CA) means dealing with cryptographic pairs of private keys and public certificates. The very first cryptographic pair we’ll create is the root pair. This consists of the root key (ca.key.pem) and root certificate (ca.cert.pem). This pair forms the identity of your CA.
in C:\wamp\vhosts\somecerts\caSetup create root certificates
 mkdir certs crl csr newcerts private
 touch index.txt
 echo 1000 > serial
put in a openssl.conf
openssl genrsa -aes256 -out private/ca.key.pem 4096 //pwd required
openssl req -config openssl.conf -key private/ca.key.pem -new -x509 -days 12000 -sha256 -extensions v3_ca -out certs/ca.cert.pem //need privar pwd and Common Name hpTimCa
openssl x509 -noout -text -in certs/ca.cert.pem //verify root cert
create intermediate certs
 cd intermediate
 mkdir certs crl csr newcerts private
 touch index.txt
 echo 1000 > serial
 echo 1000 > crlnumber
openssl genrsa -aes256 -out intermediate/private/intermediate.key.pem 4096 //same pwd
openssl req -config intermediate/openssl.conf -new -sha256 -key intermediate/private/intermediate.key.pem -out intermediate/csr/intermediate.csr.pem
openssl ca -config openssl.conf -extensions v3_intermediate_ca -days 10900 -notext -md sha256 -in intermediate/csr/intermediate.csr.pem -out intermediate/certs/intermediate.cert.pem
openssl x509 -noout -text -in intermediate/certs/intermediate.cert.pem //verify
openssl verify -CAfile certs/ca.cert.pem intermediate/certs/intermediate.cert.pem //verify against root
cat intermediate/certs/intermediate.cert.pem certs/ca.cert.pem > intermediate/certs/ca-chain.cert.pem
openssl genrsa -out intermediate/private/sslvh.tm.key.pem 2048 //omitting aes256 creates a key without a password
openssl req -config intermediate/openssl.conf -key intermediate/private/sslvh.tm.key.pem -new -sha256 -out intermediate/csr/sslvh.tm.csr.pem
openssl ca -config intermediate/openssl.conf -extensions server_cert -days 9000 -notext -md sha256 -in intermediate/csr/sslvh.tm.csr.pem -out intermediate/certs/sslvh.tm.cert.pem
openssl x509 -noout -text -in intermediate/certs/sslvh.tm.cert.pem
openssl x509 -text -noout -in sslvh.tm.cert.pem -fingerprint
The Issuer is the intermediate CA. The Subject refers to the certificate itself.
openssl verify -CAfile intermediate/certs/ca-chain.cert.pem intermediate/certs/sslvh.tm.cert.pem
You can now either deploy your new certificate to a server, or distribute the certificate to a client. When deploying to a server application (eg, Apache), you need to make the following files available:
- C:\wamp\vhosts\somecerts\caSetup\intermediate\certs\ca-chain.cert.pem
- C:\wamp\vhosts\somecerts\caSetup\intermediate\private\sslvh.tm.key.pem
- C:\wamp\vhosts\somecerts\caSetup\intermediate\certs\sslvh.tm.cert.pem
you could but I didn't create a certifice revocation lis CRL
node
mosca uses the node TLS stuff
from https://nodejs.org/api/tls.html#tls_tls_ssl
This default cipher list can be replaced entirely using the --tls-cipher-list command line switch. For instance, the following makes ECDHE-RSA-AES128-GCM-SHA256:!RC4 the default TLS cipher suite:
node --tls-cipher-list="TLS_RSA_WITH_AES_128_CBC_SHA:RC4-MD5"
debug
sparkfun thing dev
http://frightanic.com/iot/comparison-of-esp8266-nodemcu-development-boards/
- :back to breakout boards
wifi breakout board
refs
wiring
http://www.forward.com.au/pfod/ESP8266/GPIOpins/index.html
https://github.com/esp8266/Arduino/issues/1243
current sensing
http://www.esp8266-projects.com/2015/06/mailbag-arrival-acs712-current-sensor.html
MQTT
proxy
https://github.com/HublessGenericIoT/mqtt-proxy
https://www.codeproject.com/articles/1077869/proxylayer-between-mqtt-broker-any-mqtt-broker-and
node TLS
http://www.hivemq.com/blog/mqtt-client-library-mqtt-js
var mqtt = require('mqtt');
var fs = require('fs');
var KEY = __dirname + '/tls-key.pem';
var CERT = __dirname + '/tls-cert.pem';
var TRUSTED_CA_LIST = [__dirname + '/crt.ca.cg.pem'];

var PORT = 1883;
var HOST = 'stark';

var options = {
  port: PORT,
  host: HOST,
  keyPath: KEY,
  certPath: CERT,
  rejectUnauthorized : true,
  //The CA list will be used to determine if server is authorized
  ca: TRUSTED_CA_LIST
};

var client = mqtt.connect(options);

client.subscribe('messages');
client.publish('messages', 'Current time is: ' + new Date());
client.on('message', function(topic, message) {
  console.log(message);
});

client.on('connect', function(){
    console.log('Connected');
});
In case mqtts (mqtt over tls) is required, the options object is passed through to tls.connect(). If you are using a self-signed certificate, pass the rejectUnauthorized: false option. Beware that you are exposing yourself to man in the middle attacks, so it is a configuration that is not recommended for production environments.
refs
https://github.com/esp8266/Arduino/blob/master/doc/esp8266wifi/client-secure-examples.md
https://github.com/mcollina/mosca/wiki/Mosca-advanced-usage
https://github.com/mcollina/mosca/blob/master/examples/secure/secureClient.js
https://auth0.com/docs/tutorials/authenticating-devices-using-mqtt
https://github.com/256dpi/arduino-mqtt
https://io.adafruit.com/blog/security/2016/07/05/adafruit-io-security-esp8266/
reactive
https://github.com/Reactive-Extensions/RxJS/issues/112
clustering
current projects
mqttMck
in c://wamp/www/node/sb/mqtt/hqtthrs
- http://iot-playground.com/blog/2-uncategorised/41-esp8266-ds18b20-temperature-sensor-arduino-ide
- Dallas temperature wiki
mqttMck
in c://wamp/www/node/sb/mqtt/hqttMck
refs
- https://github.com/mqttjs/MQTT.js/blob/master/examples/wss/client.js
- https://github.com/afrad/angular2-websocket
- https://github.com/afrad/angular2-websocket/blob/master/angular2-websocket.ts
- https://www.eclipse.org/paho/clients/js/
- https://developer.mozilla.org/en-US/docs/Web/API/WebSockets_API/Writing_WebSocket_client_applications
URL list from Monday, Jan. 18 2016 15:48 PM
To copy this list, type [Ctrl] A, then type [Ctrl] C.
10.0.1.102:3072 http://10.0.1.102:3072/
IoT - Switch ESP8266 + LUA + MQTT + NodeJS + Socket.IO + AngularJS - YouTube https://www.youtube.com/watch?v=xmKd2lYqEPA
tuanpmt/esp_mqtt: MQTT client library for ESP8266 Soc https://github.com/tuanpmt/esp_mqtt
Report the temperature with ESP8266 to MQTT - Home Assistant https://home-assistant.io/blog/2015/10/11/measure-temperature-with-esp8266-and-report-to-mqtt/
mcollina/mosca https://github.com/mcollina/mosca
What is Redis and what do I use it for? - Stack Overflow http://stackoverflow.com/questions/7888880/what-is-redis-and-what-do-i-use-it-for
Getting started with MQTT | The Jackal of Javascript http://thejackalofjavascript.com/getting-started-mqtt/
mqttApp/server.js at master · arvindr21/mqttApp https://github.com/arvindr21/mqttApp/blob/master/server/server.js
MQTT and Node.js http://mcollina.github.io/mqtt_and_nodejs/#9
NodeMCU -- An open-source firmware based on ESP8266 wifi-soc. http://nodemcu.com/index_en.html
eclipse/ponte: Ponte Project https://github.com/eclipse/ponte
CoAP — Constrained Application Protocol | Overview http://coap.technology/
MQTT.js/secure-client.js at master · mqttjs/MQTT.js https://github.com/mqttjs/MQTT.js/blob/master/examples/client/secure-client.js
Sublime - wiki http://wiki.sitebuilt.net/wiki/index.php?title=Sublime
test.mosquitto.org http://test.mosquitto.org/
MQTT over WebSockets http://test.mosquitto.org/ws.html
view-source:test.mosquitto.org/ws.html view-source:http://test.mosquitto.org/ws.html
Free MQTT brokers for use with ThingStudio - ThingStudio BlogThingStudio Blog http://blog.thingstud.io/getting-started/free-mqtt-brokers-for-thingstudio/
Make your Raspberry Pi into the Ultimate IoT Hub - ThingStudio BlogThingStudio Blog http://blog.thingstud.io/recipes/how-to-make-your-raspberry-pi-the-ultimate-iot-hub/
Add a web client for MQTT-over-Websocket · Issue #87 · mcollina/mosca https://github.com/mcollina/mosca/issues/87
hivemq/hivemq-mqtt-web-client: A websockets based MQTT Client for your browser. https://github.com/hivemq/hivemq-mqtt-web-client
A full-featured Javascript MQTT client for your browser http://www.hivemq.com/blog/full-featured-mqtt-client-browser
Paho - Open Source messaging for M2M http://www.eclipse.org/paho/
Paho - Open Source messaging for M2M https://www.eclipse.org/paho/clients/js/
Tab-Snap - Chrome Web Store https://chrome.google.com/webstore/detail/tab-snap/ajjloplcjllkammemhenacfjcccockde?utm_source=chrome-app-launcher-info-dialog
breakout boards
Programming This sensor has a usable range of about 3-55,000 lux. This covers a pretty wide range of indoor and outdoor lighting conditions:
Illuminance
- 0.002 lux Moonless clear night sky
- 0.2 lux Design minimum for emergency lighting (AS2293).
- 0.27 - 1 lux Full moon on a clear night
- 3.4 lux Dark limit of civil twilight under a clear sky
- 50 lux Family living room
- 80 lux Hallway/toilet
- 100 lux Very dark overcast day
- 300 - 500 lux Sunrise or sunset on a clear day. Well-lit office area.
- 1,000 lux Overcast day; typical TV studio lighting
- 10,000 - 25,000 lux Full daylight (not direct sun)
- 32,000 - 130,000 lux Direct sunlight
- back to electronics
esp8266
current projects
hvac
- DHT shroom
- humidity temp control for noah -dht11+2relays 1 input, 2output
- temp
- outdoor thermometer -ds18b20, 1 input
- DSP18B20 hrc
- heated roof control-1 relay, 2inputs, 1output
- timerrelay
- timer for plants 1relay 1 output
- DHT irrig
- gravity feed water release (moisture level input dht11(io14d5)), out timr1(io15d8)
using with HDT11
- https://www.wemos.cc/product/dht-shield.html
- https://github.com/adafruit/DHT-sensor-library
- https://github.com/wemos/D1_mini_Examples/blob/master/examples/04.Shields/DHT_Shield/Simple/Simple.ino
- http://www.circuitbasics.com/how-to-set-up-the-dht11-humidity-sensor-on-the-raspberry-pi/
- http://www.circuitbasics.com/how-to-set-up-the-dht11-humidity-sensor-on-an-arduino
notes on esp8266
Hi Mitul,
My best esp8266 code is in https://github.com/mckennatim/demiot. A couple of notes on it.
You can always get it online by hard coding your SSID info ala...
   #include <ESP8266WiFi.h>
   #include <ESP8266WebServer.h>

   const char *ssid = "street_no_vale2";
   const char *pwd = "jjjjjjjj";

   ESP8266WebServer server(80);

   void handleRoot() {
     server.send(200, "text/html", "h1 root of espAPsb AP server /h1");
   }

   void getOnline(){
     WiFi.begin(ssid, pwd);
     int tries =0;
     int success=1;
     while (WiFi.status() != WL_CONNECTED ) {
       delay(500);
       Serial.print(".");
       tries++;
       if (tries==15){
         success=0;
         scan();
         setupAP();
         break;
       }
     }
     if (success){
       Serial.println("");
       Serial.println("WiFi connected");
       Serial.print("IP address: ");
       Serial.println(WiFi.localIP());
     }
   }
   void setup(){
     Serial.begin(115200);
     Serial.println();
     Serial.println("--------------------------");
     Serial.println("ESP8266 webconfig");
     Serial.println("--------------------------");
     getOnline();
   }
   void loop(){
     server.handleClient();
   }
but that is not at all interesting for a couple of reasons
- you shouldn't have to be reconnect and upload over USB every time you move to a new SSID
- this sets you up as a server instead of client. There are lots of downsides to that. (your customers have to open ports on their routers ala xbox, an outside server&clients needs to keep track of its IP...)
So you need to be able to webconfig the thing and then run it as a client.
In denmiot/essp8266/mqttall I broke out webconfig in `#include "config.h"` (excuse the `extern` globals).
setup calls getOnline() which reads a config from the EEPROM and connects but if that fails it jumps into webconfig mode, turning itself into and access point server with an SSID of `espAPsb` and an ip of 192.168.4.1 where you can send it a get string like
http://192.168.4.1/config?ssid=street_no_vale2&pwd=jjjjjjjj&devid=CYURD001&ip=10.0.1.100&port=3332
once you send it that it reboots itself (sometimes you need to hit the reset or powerdown) as a client on your local wifi.
mqtt
mqtt is a very cool pu/sub/ protocol. For some reason though it won't automatically reconnect when you do a webconfig. You have to power down first
TLS on esp8266
- back to TLS_SSL
refs
http://shinysparkly.com/blog/2015/05/31/node-in-apache/
https://github.com/mcollina/mosca/wiki/TLS-SSL-Configuration
https://github.com/esp8266/Arduino/issues/43 ssl on espe266
https://github.com/esp8266/Arduino/issues/2306
me: Normally one would want the baddest certifcate you can get, un-deciferable cifers, un-stealable keys ...
I have a different need, a dumbed down tls1.1 small key/cipher/cert that will work on esp8266's, these tiny, wifi enabled, mqtt protoocol running, $2, iot devices. OK so I made a 512byte private key. Now I need to make a cert and a sha-1 thumbprint that will work with small memory devices using tls1.1, TLSRSAWITHAES128CBCSHA or RC4-MD5 ciphers.
Any ideas on an oppenssl command to get that?
https://www.feistyduck.com/library/openssl-cookbook/online/ch-openssl.html#
https://www.openssl.org/docs/man1.0.2/apps/ciphers.html#CIPHER-LIST-FORMAT
http://unix.stackexchange.com/questions/140601/verifying-a-ssl-certificates-fingerprint
http://serverfault.com/questions/216814/wireshark-display-filter-protocol-tlsv1-and-packetlength
ssl.record.version == 0x0302
That tells Wireshark to only display packets that are SSL conversations using TLS semantics.
http://blog.abarbanell.de/raspberry/2016/01/09/arduino-nginx/
me: Doesn't the nginx proxy need crt's and key's? Will it just work like a browser and encrypt deencrypt automagically?
Tobias Abarbanell Hi Tim, in this process the nginx is a server receiving requests over http and then on the encrypted side it is a client, so it does not need to have certificates.
If you want traffic coming the other direction, from the outside to your devices you would need certificates on the nginx and I would recommend using letsencrypt (https://letsencrypt.org) for this purpose.
Hi Tobias,
Thanks. BTW I think I had already solved the "traffic coming the other direction" problem. I've been loving mqtt as a lightweight protocol to have my esp8266's converse with the world. On my outside nginx vps I am running mosca inside a node app. Mosca is a broker. Devices an clients subscribe and publish to topics and mosca routes them. So my guess is having the pi handle the tls stuff, I'd be able to get data in too.
Meanwhile if I've discovered (after lots of error and error) if I limit the ciphers and keysize I can get TLSv1.1 working rather reliably straight from the esp8266. I haven't dropped a handshake in an hour now. Having WiFiClientSecure just use a fingerprint of the certificate (512 bit certificate) it verifies and accepts the cert. Instead of letting node run with its TLSv1.2 super secure big bloated ciphers I start node like this: node --tls-cipher-list='TLS_RSA_WITH_AES_128_CBC_SHA:RC4-MD5' lib/index.js. Ok so I won't win any awards for TLS and can't use AWS IOT(req TLSv1.2 and big ciphers), but the sensors and relays all over my house and yard will be very hard to mess with nonetheless.
Mosca sends mqtt to web clients using websockets. That's the final piece of the puzzle for me to tackle, wss for apache(windows testmachine) and nginx(ubuntu16.04vps)
Your idea is brilliant and I can't wait to try it on a pi.
https://github.com/esp8266/Arduino/issues/2306
As you see from the list, two cipher suites supported by axTLS library on the ESP side (TLS_RSA_WITH_AES_128_CBC_SHA and TLS_RSA_WITH_AES_256_CBC_SHA) are not among the list of cipher suites supported by your server. This causes handshake failure, because if the server and client have no cipher suites in common, they can't talk to each other.
now the above post shows the current library supports RC4-MD5 (I believe) - but I'm not sure how to prioritize it in the handshake? That is, until SHA256 is added :)
https://github.com/esp8266/Arduino/issues/2201
http://nodemcu.readthedocs.io/en/latest/en/modules/crypto/
for nodemcu The crypto modules provides various functions for working with cryptographic algorithms.
The following encryption/decryption algorithms/modes are supported: - "AES-ECB" for 128-bit AES in ECB mode (NOT recommended) - "AES-CBC" for 128-bit AES in CBC mode
The following hash algorithms are supported: - MD2 (not available by default, has to be explicitly enabled in app/include/user_config.h) - MD5 - SHA1 - SHA256, SHA384, SHA512 (unless disabled in app/include/user_config.h)
{"given_cipher_suites":["TLS_RSA_WITH_AES_128_CBC_SHA","TLS_RSA_WITH_AES_256_CBC_SHA","TLS_RSA_WITH_RC4_128_SHA","TLS_RSA_WITH_RC4_128_MD5"],"ephemeral_keys_supported":false,"session_ticket_supported":false,"tls_compression_supported":false,"unknown_cipher_suite_supported":false,"beast_vuln":false,"able_to_detect_n_minus_one_splitting":false,"insecure_cipher_suites":{"TLS_RSA_WITH_RC4_128_MD5":["use RC4 which has insecure biases in its output"],"TLS_RSA_WITH_RC4_128_SHA":["use RC4 which has insecure biases in its output"]},"tls_version":"TLS 1.1","rating":"Bad"}
{"pid":5768,"hostname":"tim-hp","name":"mosca","level":40,"time":1484804098536,"msg":"101057795:error:14094410:SSL routines:ssl3_read_bytes:sslv3 alert handshake failure:openssl\\ssl\\s3_pkt.c:1472:SSL alert number 40\n","type":"Error","stack":"Error: 101057795:error:14094410:SSL routines:ssl3_read_bytes:sslv3 alert handshake failure:openssl\\ssl\\s3_pkt.c:1472:SSL alert number 40\n\n at Error (native)","client":"ESP8266Client-e1e","v":1}
openssl s_client -connect sslvh.tm:8883 -tls1
CONNECTED(00000003)
depth=0 /C=US/ST=MA/L=Boston/O=sitebuilt.net/OU=dog/CN=sslvh.tm/emailAddress=mckenna.tim@gmail.com
verify error:num=18:self signed certificate
verify return:1
depth=0 /C=US/ST=MA/L=Boston/O=sitebuilt.net/OU=dog/CN=sslvh.tm/emailAddress=mckenna.tim@gmail.com
verify return:1
---
Certificate chain
 0 s:/C=US/ST=MA/L=Boston/O=sitebuilt.net/OU=dog/CN=sslvh.tm/emailAddress=mckenna.tim@gmail.com
   i:/C=US/ST=MA/L=Boston/O=sitebuilt.net/OU=dog/CN=sslvh.tm/emailAddress=mckenna.tim@gmail.com
---
Server certificate
-----BEGIN CERTIFICATE-----
MIIDkjCCAnoCCQDp7cwG8OKZBjANBgkqhkiG9w0BAQUFADCBijELMAkGA1UEBhMC
VVMxCzAJBgNVBAgMAk1BMQ8wDQYDVQQHDAZCb3N0b24xFjAUBgNVBAoMDXNpdGVi
dWlsdC5uZXQxDDAKBgNVBAsMA2RvZzERMA8GA1UEAwwIc3NsdmgudG0xJDAiBgkq
hkiG9w0BCQEWFW1ja2VubmEudGltQGdtYWlsLmNvbTAeFw0xNzAxMTMyMjExMzla
Fw0xODAxMTMyMjExMzlaMIGKMQswCQYDVQQGEwJVUzELMAkGA1UECAwCTUExDzAN
BgNVBAcMBkJvc3RvbjEWMBQGA1UECgwNc2l0ZWJ1aWx0Lm5ldDEMMAoGA1UECwwD
ZG9nMREwDwYDVQQDDAhzc2x2aC50bTEkMCIGCSqGSIb3DQEJARYVbWNrZW5uYS50
aW1AZ21haWwuY29tMIIBIjANBgkqhkiG9w0BAQEFAAOCAQ8AMIIBCgKCAQEAtobF
4ubgPP4bEQlhXCIMA7vwi7oqjJZ6qhp80tMdhvcI/Cjz/BsGKtxbiLlivcJozV67
YOdidTS1CjH7vmxxxhIodF+g6LdoSJ75Sa2iRvCzbeGkrcNRL93jTkqQvYoG4GEz
t5aBLnFnVDCr299d+VchOGv1Q3ChvLNxAU6TqMzhPoHKPH7DnGF9wSR9qvRP7rI+
wq9+QeuLdQaQmUVnt80OZFp2Oq/9WGu5tiEie7JZcFqbNq2dFycIm2wa2/4mBJvA
5Qcw6aV5C0Al870go0O6OSIODZ+RQg/KRunXXtFcSqdi8iuF6R2tzNbd5Vh2+ANK
lTfStFJAH9IcXE/EVwIDAQABMA0GCSqGSIb3DQEBBQUAA4IBAQCmalVCojqvTHlE
guDhoRX98FldiCpAI40ZWODiClQe7IR6ANPc8rqsMtfyfwIsYdXqcZzj5NBrIGp1
SST7uVoA2YIy4eGs8AmKNKf4CkLEPM+7ST5mmpKtrUNmHrFjYUyn6C/iu8Vyx6lP
MadCPezDB8qeCj5Z3ylYTLIBog1f29gkmqTCJtt7FIhFECSUGrYVMmyaScXONV5y
UZSnGNoRWuqdcGu0a6PKBb270vpdUa2yPwFWwbMJxsCc/2sT7YQcAk++r6WFk1qF
7AiNdZYsEgmjnkGGHRbjKTxk1Osh+G8uV3e6KzE/G5d0K80dIX8jLSPH6yYCYfe5
msMayEMI
-----END CERTIFICATE-----
subject=/C=US/ST=MA/L=Boston/O=sitebuilt.net/OU=dog/CN=sslvh.tm/emailAddress=mckenna.tim@gmail.com
issuer=/C=US/ST=MA/L=Boston/O=sitebuilt.net/OU=dog/CN=sslvh.tm/emailAddress=mckenna.tim@gmail.com
---
No client certificate CA names sent
---
SSL handshake has read 1080 bytes and written 412 bytes
---
New, TLSv1/SSLv3, Cipher is AES256-SHA
Server public key is 2048 bit
Compression: NONE
Expansion: NONE
SSL-Session:
    Protocol  : TLSv1
    Cipher    : AES256-SHA
    Session-ID: EB450D46B951B96AB6D8F3B10762772F05D8D9E65998FEC796EAA852A335FFD2
    Session-ID-ctx:
    Master-Key: 6F9AA7D47D1E352283BC6D7715A4664E184E4B565B14F6288350E117D3D9F6FD6869F28E66481822B1B37CC35E252BE0
    Key-Arg   : None
    Start Time: 1484812097
    Timeout   : 7200 (sec)
    Verify return code: 18 (self signed certificate)
https://www.bountysource.com/issues/28368887-compatibility-with-arduino-and-esp8266
- http://iot-playground.com/2-uncategorised/40-esp8266-wifi-relay-switch-arduino-ide
- web based configuration
openssl
back to esp8266
in cd ../vhosts/somecerts/smallcerts/
Generate a Private Key and a CSR
openssl req -newkey rsa:512 -nodes -keyout domain.key -out domain.csr
Generate a Self-Signed Certificate from an Existing Private Key
openssl req -key domain.key -new -x509 -days 365 -out domain.crt
View CSR Entries
openssl req -text -noout -verify -in domain.csr
View Certificate Entries
openssl x509 -text -noout -in domain.crt
Verify a Certificate was Signed by a CA
openssl verify -verbose -CAFile ca.crt domain.crt
from https://www.feistyduck.com/library/openssl-cookbook/online/ch-openssl.html#
openssl genrsa -out fd.key 512                           //create private key (no pass)
openssl rsa -in fd.key -pubout -out fd-public.key        //to separate out the public key
openssl req -new -key fd.key -out fd.csr                 //create csr from key
openssl req -text -in fd.csr -noout                      //show your csr
openssl x509 -req -days 365 -in fd.csr -signkey fd.key -out fd.crt          // create a cert w/o questions
openssl x509 -text -in fd.crt -noout                     //view the cert
openssl x509 -text -noout -in fd.crt -fingerprint        //GET A CERTS FINGERPRINT
Ciphers
openssl ciphers -v 'ALL:COMPLEMENTOFALL' //list available
https://engineering.circle.com/https-authorized-certs-with-node-js-315e548354a2#.3atvisjhz
vis a vis letsencrypt
- your key file will be privkey.pem
- your cert file will be cert.pem
- your ca file will be chain.pem or fullchain.pem ( depending exactly what you need )
creating a certificate signing authority ca (and cert and key)
https://jamielinux.com/docs/openssl-certificate-authority/create-the-root-pair.html
Acting as a certificate authority (CA) means dealing with cryptographic pairs of private keys and public certificates. The very first cryptographic pair we’ll create is the root pair. This consists of the root key (ca.key.pem) and root certificate (ca.cert.pem). This pair forms the identity of your CA.
in C:\wamp\vhosts\somecerts\caSetup create root certificates
 mkdir certs crl csr newcerts private
 touch index.txt
 echo 1000 > serial
put in a openssl.conf
openssl genrsa -aes256 -out private/ca.key.pem 4096 //pwd required
openssl req -config openssl.conf -key private/ca.key.pem -new -x509 -days 12000 -sha256 -extensions v3_ca -out certs/ca.cert.pem //need privar pwd and Common Name hpTimCa
openssl x509 -noout -text -in certs/ca.cert.pem //verify root cert
create intermediate certs
 cd intermediate
 mkdir certs crl csr newcerts private
 touch index.txt
 echo 1000 > serial
 echo 1000 > crlnumber
openssl genrsa -aes256 -out intermediate/private/intermediate.key.pem 4096 //same pwd
openssl req -config intermediate/openssl.conf -new -sha256 -key intermediate/private/intermediate.key.pem -out intermediate/csr/intermediate.csr.pem
openssl ca -config openssl.conf -extensions v3_intermediate_ca -days 10900 -notext -md sha256 -in intermediate/csr/intermediate.csr.pem -out intermediate/certs/intermediate.cert.pem
openssl x509 -noout -text -in intermediate/certs/intermediate.cert.pem //verify
openssl verify -CAfile certs/ca.cert.pem intermediate/certs/intermediate.cert.pem //verify against root
cat intermediate/certs/intermediate.cert.pem certs/ca.cert.pem > intermediate/certs/ca-chain.cert.pem
openssl genrsa -out intermediate/private/sslvh.tm.key.pem 2048 //omitting aes256 creates a key without a password
openssl req -config intermediate/openssl.conf -key intermediate/private/sslvh.tm.key.pem -new -sha256 -out intermediate/csr/sslvh.tm.csr.pem
openssl ca -config intermediate/openssl.conf -extensions server_cert -days 9000 -notext -md sha256 -in intermediate/csr/sslvh.tm.csr.pem -out intermediate/certs/sslvh.tm.cert.pem
openssl x509 -noout -text -in intermediate/certs/sslvh.tm.cert.pem
openssl x509 -text -noout -in sslvh.tm.cert.pem -fingerprint
The Issuer is the intermediate CA. The Subject refers to the certificate itself.
openssl verify -CAfile intermediate/certs/ca-chain.cert.pem intermediate/certs/sslvh.tm.cert.pem
You can now either deploy your new certificate to a server, or distribute the certificate to a client. When deploying to a server application (eg, Apache), you need to make the following files available:
- C:\wamp\vhosts\somecerts\caSetup\intermediate\certs\ca-chain.cert.pem
- C:\wamp\vhosts\somecerts\caSetup\intermediate\private\sslvh.tm.key.pem
- C:\wamp\vhosts\somecerts\caSetup\intermediate\certs\sslvh.tm.cert.pem
you could but I didn't create a certifice revocation lis CRL
node
mosca uses the node TLS stuff
from https://nodejs.org/api/tls.html#tls_tls_ssl
This default cipher list can be replaced entirely using the --tls-cipher-list command line switch. For instance, the following makes ECDHE-RSA-AES128-GCM-SHA256:!RC4 the default TLS cipher suite:
node --tls-cipher-list="TLS_RSA_WITH_AES_128_CBC_SHA:RC4-MD5"
debug
sparkfun thing dev
http://frightanic.com/iot/comparison-of-esp8266-nodemcu-development-boards/
- :back to breakout boards
wifi breakout board
refs
wiring
http://www.forward.com.au/pfod/ESP8266/GPIOpins/index.html
https://github.com/esp8266/Arduino/issues/1243
current sensing
http://www.esp8266-projects.com/2015/06/mailbag-arrival-acs712-current-sensor.html circuitlab mcktimo 6j
projects in process
solar water valve
Control a 12v water valve powered by solar. When the sun is shining enough it wakes up the processor which hooks itself to wifi and figures what it should do. INREALITY 12v solar panel doesn't have enough power to open a 12v solenoid (needs nore than .6amps)
http://www.electronicdesign.com/analog/what-s-all-solenoid-driver-stuff-anyhow
https://www.edn.com/design/analog/4399713/Booster-circuit-enables-reliable-solenoid-operation-
http://www.sunrise-ev.com/LeesEVs.htm
http://solarbotics.net/library/circuits/se_t1_zener.html
https://rayshobby.net/minty-water-valve-controller/
water control project
little app to communicate between browser/app and microcontroller to run a small waterfall
We have two little ponds in the yard fed by the rainwater from the roof. They are at the base of a big outcropping of roxbury pudding stone. Water is pumped from the lower pond to the upper pond and from the upper pond up the side of the ledge.
There is an app, "cascada" that starts the pumps and energizes the circuits to turn on the waterfall and control the level of the lower pond.
If it hasn't rained in a while, over time water evaporates and leaks out. The level of the pond is controlled using a $10 lawn sprinkler valve to inject water into the pond when the falls below a certain level. Water gets added while the pumps are on until it reaches the max level then it goes off. If you turn on the pumps again it doesn't continue filling but waits to inject water til the water falls to the low water sensor.
The water level control is independent of the pond timer, is located in its own circuit box on the porch and is activated whenever the waterfall is on.
The other circuit is connected to the house ethernet and contains a server, relays and timers to turn the system on and off. Its microcontroller is connected to an Enc28j60 chip that implements a server capable of delivering GET string variables to the microcontroller.
The app is written in HTML5/javascript, resides on http://cascada.sitebuilt.net and uses $.get to send a string to a php script on the that server which transfers it by curl to the external Enc28j60 server located in the house. It does this via a http://www.noip.com/ since the home network's IP can change. It tells the controller which circuit it wants on and for how long. more info
online heating system control project
description
The most advanced and easy to use user interface these days is probably the one contained in your smartphone or tablet. Apps are easy to use, interactive and readily update-able. The interface on your programmable thermostat probably wouldn't be high on that list. And if you have more than one heating zone then the difficulty is multiplied.
Replace those thermostats with temperature sensors and control the whole house from one interface. Slip a microcontroller device between the thermostat connections and the heating/cooling system. Connect it to the home network and you are ready to go. From 1 zone to 8 zones, it will monitor and control them all.
Start collecting data on your energy use. Which zone calls for heat the most? Which takes longest to heat up? How much would it cost to be a little warmer? How much is setting back the thermostat saving me in my house? Optimize your hydronic system by running the boiler at a lower temperature on a warmer day.
Overriding any zones program is easy and can be done remotely from any connected device, phone tablet or browser.
An Avr microcontroller takes in temperature readings from multiple locations. At the control room the AVR hub polls temperature and for each zone knows the set temperature, the default temperature and whether or not a zone is ON and how long it has been on. If it doesn't hear from the (linux) scheduler then it falls back to act as a multi-zone thermostat set at the default temperatures.
The scheduler would take temperature data from the AVR client and would know the schedule. Whenever a schedule change point would come up, it would notify the AVR and instruct it to change the set point.
The controller would on the client probably an HTML5/javascript client. Here you can read the temperatures and view the schedule. You can override or change the schedule.
pic
schematics, circuits, projects
parts
needed parts (next order)
- thermistors
- 5K and 10K POTS
dx.com
atmel 328 $5.50 arduino atmel 328 $3.50
ATmega328 with Arduino Optiboot (Uno)DEV-10524 Description: The name says it all on this one. An ATmega328 in DIP package, pre-loaded with the Arduino Optiboot (Uno 16MHz) Bootloader. This will allow you to use Arduino code in your custom embedded project without having to use an actual Arduino board. To get this chip working with Arduino IDE, you will need an external 16MHz crystal or resonator
DS1620 Digital Thermometer and Thermostat
In a thermostat circuit
DS18B20 Maxim 1-wire temperature sensors
- DS18B20 datasheet$1.00 each for chip, $3.00 each for waterproof sensor
one-wire protocol
- https://arduino-info.wikispaces.com/Brick-Temperature-DS18B20 multiple
- OneWire tutorial another better library
- color code for encased DS18B20 sensor red=vcc,black=gnd,yellow=data

Graphic LCD 84x48 - Nokia 5110
- Graphic LCD 84x48 - Nokia 5110 runs on 3.3v so you have to interface carefully
KTM-S1201 lcd module
DK-duino DKUNO Atmega328p-20PU USB Board

Descriptions
Compatible with Arduino duemilanove 2009 Microcontroller: ATmega328P-PU USB to RS232 Controller: PL2303HX I/O compatible with Arduino UNO R3 Operating Voltage (logic level) : 5V Input Voltage (recommended) : 7.2-11.1V Input Voltage (limits) : 6-20V Package Content
1*DK-duino DKUNO Atmega328p-20PU USB Board 1* USB 2.0 cable
Ethernet Shield With Wiznet W5100 Ethernet Chip
( latest version ) Compatible Duemilanove (168/328) / Mega (1280/2560) / UNO
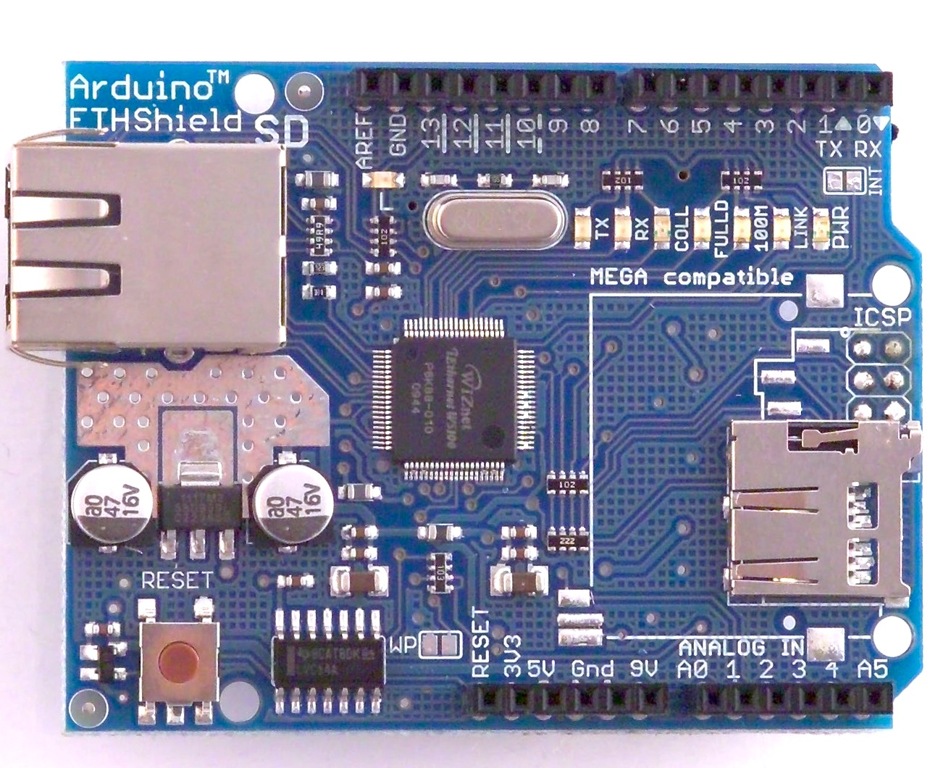
Product Description

     This is the latest version  of the Ethernet Shield. This Arduino Ethernet Shield which is based on the Wiznet W5100 Ethernet Chip gives you an easy way to get your Arduino Online. It is directly supported by Arduino official Ethernet Library. It adds a micro-SD card slot, which can be used to store files for serving over the network. It is compatible with the Arduino Duemilanove (168 or 328), Uno as well as Mega (1280/2560) and can be accessed using the SD library.
The Wiznet W5100 provides a network (IP) stack capable of both TCP and UDP. It supports up to four simultaneous socket connections. Use the Ethernet library to write sketches which connect to the internet using the shield.
6002
circuits
countdown timer relay
MPPT charge circuit
freechargecontroller.org
Arduino PPT Solar Charger Hardware Description by Tim Nolan 5/9/09
These are my notes on the hardware and schematic for my Arduino Peak Power Tracker Solar Charger project. These notes are based on my schematic ArduinoSolar.pdf on my website www.timnolan.com.
This project is based on the open source hardware platform of the Arduino Duemilanove. I got mine at Sparkfun (www.sparkfun.com) but there are other places you can get them (www.makershed.com). The Arduino webpage that includes links to the Duemilanove schematic is at http://arduino.cc/en/Main/ArduinoBoardDuemilanove.
The Arduino Duemilanove takes care of the microprocessor part of the project. I built the charger part of the project on a ProtoShield Development Kit that I also got at Sparkfun. This is a small prototype board that has connectors to mate directly to the Arduino processor board and bring all the signals up to the prototype space. I was able to fit the complete charger circuit into this prototype space. If you take a look at the photos on my website you can see how the components are placed on the ProtoShield. I've also included the parts list for this project with the Digikey and Sparkfun parts numbers in the file ArduinoSolarPartsList.txt on my website www.timnolan.com.
The charger circuit is basically a DC/DC converter (in a buck configuration) controlled by the software in the microprocessor. The software figures out the voltage of solar panels where the Peak or Maximum Power is produced and controls the DC/DC converter to match the solar panel voltage to the battery voltage. The processor controls the DC/DC converter by generating a PWM signal that switches the MOSFETs at a 50kHz frequency. The transfer ratio of voltage in vs. voltage out is based on the duty cycle of the PWM signal.
Looking at the schematic ArduinoSolar.pdf the connector (J1) for the Solar Panel input is in the upper left corner. There is no protection for polarity reversal so make sure that the solar panels are connected correctly. The solar panel input voltage is connected to the Vin or Raw input to the Arduino board which goes to a voltage regulator to generate 5V to run the processor. The 5v also comes back to the ProtoShield board. The solar panel ground input is connected to the ground of the ProtoShield and Arduino processor board. The solar panel input voltage is divided down by R4 and R5 and sent to the Analog_0 input of the Arduino to be read by the processor.
The solar input current is read by R1 the .005 ohm current sense resistor that generates a very small voltage when the current flows. That voltage is picked up and amplified by IC1 the MAX4173H which is a high side current sense amplifier. The MAX4173H has an amplification of factor of 100. So if 5A is flowing through R1 it generates 5A x .005 ohms = 0.025V x 100 = 2.5V to be read by the processor. The MAX4173H only comes in surface mount SOIC8 package so I used a little conversion board from Sparkfun. I soldered the MAX4173H to the board and then used the 8 pin dip socket to plug it into the ProtoShield board.
C2 is the input filter capacitor that smooths out the input current pulses. Q1 is the blocking MOSFET that keeps the battery power from flowing back into the solar panels at night. Normally this is done by a diode in the power path but a since all diodes have a voltage drop a MOSFET is much more efficient. Notice that Q1 is turned around so the intrinsic MOSFET diode does not conduct. Q1 turns on when Q2 is on from voltage through D2. R3 drains the voltage off the gate of Q1 so it turns off when Q2 turns off.
Q2 is the main switching MOSFET for the buck converter and Q3 is the synchronous switching MOSFET. The MOSFET are driven by IC2 which is an IR2104 MOSFET driver. The IR2104 takes the PWM signal (Digital_9) from the processor input on pin 2 and uses it to drive the switching MOSFETs. The IR2104 can also be shut down with the control signal (low on Digital_8) from the processor on pin 3. Since Q2 is an NFET it needs a gate drive voltage that is 10V higher than the source voltage which is the solar input. So the IR2104 uses a charge pump circuit made of D3 and C4 to boost the gate drive voltage to turn on the high side MOSFET. This charge pump circuit only works when the MOSFETs are switching. The software keeps track of the PWM duty cycle and never allows 100% or always on. It caps the PWM duty cycle at 99.9% to keep the charge pump working.
D1 is an ultra fast diode that will start conducting current before Q3 turns on. It is supposed to make the converter more efficient but it may not be necessary. L1 is the main inductor that smooths the switching current and along with C3 it smooths the output voltage. Since the DC/DC converter is switching at 50kHz the 33uH value of the inductor should be sufficient. C7 and R10 are the snubber network used to cut down on the ringing of the inductor voltage.
To measure the battery voltage R6 and R7 make up the voltage divider which feeds the signal to Analog_2 to be read by the processor. J3 is the battery connector, there is no reverse polarity protection so make sure the battery is connected correctly. I did not have space to fit a fuse so make sure you put a fuse in your battery wiring harness. Batteries hold a lot of energy and you can start a fire if something goes wrong and you do not have a fuse. Also you might want to put a diode in battery wiring harness during development. If you look at the schematic you can see that if Q3 ever stays on for any length of time that it is a dead short across the battery. This would not happen in normal operation but if you have a software bug or you stop the system to load new software it might end up with Q3 on. A diode would stop this from happening but you would lose efficency in the diode voltage drop. Once you have the software worked out this diode is no longer necessary. I've burned up my fair share of MOSFETs before I figured this out.
I've included the two LEDs and switch that are on the ProtoShield board in my schematic. I use the one LED JC2 as a heartbeat indicator in my system.
12vdc-5vdc step down converter
using a $.37 MC34063ECN Switching Converters, Regulators & Controllers 3.0 to 40V DC-DC Cnv from mouser datasheet
The simplest way to reduce the voltage of a DC supply is to use a linear regulator (such as a 7805), but linear regulators waste energy as they operate by dissipating excess power as heat. Buck converters, on the other hand, can be remarkably efficient (95% or higher for integrated circuits), making them useful for tasks such as converting the main voltage in a computer (12 V in a desktop, 12-24 V in a laptop) down to the 0.8-1.8 volts needed by the processor. http://en.wikipedia.org/wiki/Buck_converter
switching converters explained
arduino
resistor color codes
refs
- http://www.qsl.net/ve3lny/index.html
- arduino-info - Nrf24L01-2.4GHz-HowTo
- Arduino Differential Conntroller | Arduino Solar Hot Water | Differduino | Nateful
- My Page - GarageLab (arduino, electronics, robotics, hacking)
- Ethernet Arduino Library, using WizNET Ethernet modules with Teensy
- PC/CP300 Electronics Laboratory II
- 8-Channel 12V Relay Module for Arduino PIC ARM AVR DSP - Free Shipping - DealExtreme
- Shield stacking headers for Arduino ID: 85 - $1.50 : Adafruit Industries, Unique & fun DIY electronics and kits
- Circuit Boards within Project Accessories - MCM Electronics Category
- Relays and Practical Circuits
- Embedded PIC based SBC board with Ethernet, RS232, I2C, 12 Analog Inputs, 32 Digital I/Os, free TCP
- tuxgraphics.org: An AVR microcontroller based Ethernet device
- FreePCB: freeware PCB layout software
- Parts & Kits for Arduino Online, Buy Microcontroller Boards, Electronic Components for Arduino - EtherMega (100% Arduino Mega 2560 compatible with onboard Ethernet) - Freetronics
- TCP/IP Stack, FAT16 System on a Microcontroller - CodeProject
- Start Using HTML5 WebSockets Today | Nettuts+
- www.clare.com/home/pdfs.nsf/www/CPC1998.pdf/$file/CPC1998.pdf
- How To Solder - Soldering Tutorial
- Solid State Relays
- Transistor Circuits
- Datasheet4U.net - World Electronic Components Datasheet Search Site!
- [http://nl.bu.edu/research/software/downloads/ Downloads �� Software �� Research �� Neuromorphics Lab]
- Graphical Resistance Calculator
- How to Build a Robot Tutorial - Society of Robots
- Reverse-Engineering an LCD Display
- SMPS Basics - The Buck Converter
- GuideCircuit : Free Electronics Circuit on website ; Digital thermostat
- GuideCircuit : Free Electronics Circuit on website ; Schematics of Digital thermostat
- ===newmodel===
basics
- LED flat section toward ground
- breadboard power bars 1/2 of long side
op amps
on using wall warts in circuit design
http://www.dxing.info/equipment/wall_warts_bryant.dx
sample circuits
http://www.discovercircuits.com/S/solidstate.htm
http://members.vol.at/home.floery/electronix/picnic/documentation.html
http://www.edaboard.com/thread5683.html
http://microcontrollerkits.blogspot.com/2011/11/arduino-microcontroller-control-tcpip.html
http://tuxgraphics.org/electronics/200606/article06061.shtml
http://8bitmicro.blogspot.com/2012_02_01_archive.html
http://www.freetronics.com/products/etherten